Recently I was working on a prototype Force.com application for which I anticipated heavy use of Salesforce Approvals Processes. When testing my prototype, I found the record locking system with Approvals fell short of what I wanted – I needed to be able to lock specific fields rather than the record as a whole.
My Approvals Process made use of a “stage” pickist provided in the prototype App, and I realised that I could achieve what I wanted by using validation rules in conjunction with this stage field. However, the validation rules would be fairly complex, and not particularly easy to modify if the business requirements changed.
What I wanted was an easy way for users to configure field locking based on a stage / status field on a record, for any object type… LockingRules.
Prototype
So I set about building a LockingRules prototype which allows a user to first pick a field to be used to define the record’s stage (at the moment this must be either a picklist or checkbox), and then go on to specify how fields should be locked at each stage, using a simple checkbox grid.
The rules are enforced using triggers. All that’s needed is a one line trigger which invokes a general handler class, so its very easy to extend for unmanaged or managed-package custom objects.
The solution does not need to be used with Approvals of course – it can be used wherever you need selective locking based on records state.
You can find the full source code for LockingRules shared in a Github Repository, so you can embed it into your own projects if you so wish.
LockingRules Evaluation Packages
I have also produced a pair of beta managed packages for evaluation purposes – one package contains the LockingRules utility and an extension package contains an Opportunity trigger.
If Locking Rules were to be packaged as a standalone utility I would expect to package the triggers in extension packages, for example: “Locking Rules for CRM”, “Locking Rules for FinancialForce PSA“, “Locking Rules for FinancialForce Accounting” etc. I have followed this pattern for the evaluation packages. Here are the installation URLs:
LockingRules 1.1 (Beta 1)
LockingRules for CRM 1.0 (Beta 1)
Being beta packages, they can be installed only in developer or sandbox orgs. Naturally you need to install the main LockingRules package before the CRM extension package.
Configuration
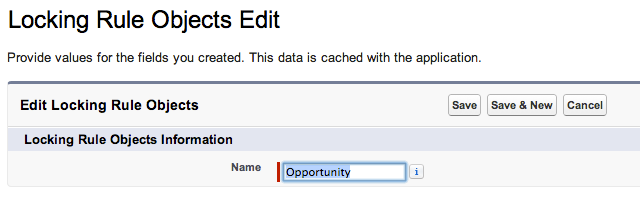
A “Locking Rule Objects” custom setting (Setup | Develop | Custom Settings) is used to govern which objects can have rules. Use the “manage” option to add a custom setting record for each object you want to use with Locking Rules, entering the API name of the object as the custom setting name:
LockingRules can be used with standard objects (Product, Account, Opportunity), custom objects, or objects contained in managed packages.
If you specify an object belonging to a managed package then the namespace prefix must be entered all lower-case.
In addition to the custom setting, a simple trigger is also required to enforce the rule. The LockingRules for CRM evaluation package contains a sample Opportunity trigger. If you want to create LockingRules for other objects, you will need to create your own simple triggers to enforce the rules. For example, to enforce Locking Rules on Accounts you will need an Account trigger:
trigger AccountLockingRule on Account (after update)
{
   LockingRules.LockingRuleHandler.handleTrigger();
}
If it is more appropriate, you could of course invoke the handleTrigger method from an existing trigger.
The custom setting governs the UI for building the rules – whereas the triggers apply the rules to record updates.
Creating a Rule
Once the triggers are in place and custom settings are set up for each object that you want to work with LockingRules, a standard user can define and update the rules from the Locking Rules tab. Each rule is defined as a single record of the Locking Rule object.
There can currently be only one rule for each object type.
Go to the Locking Rules tab, and click “New”. Pick the object type from the drop-down list. The drop-down list shows the label and API name of the available objects (as defined in the custom setting above).
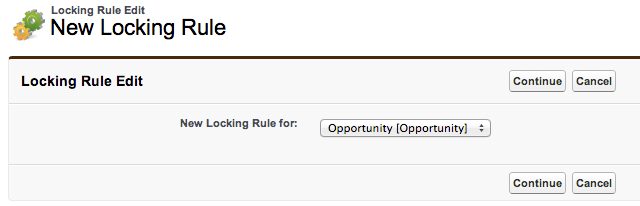
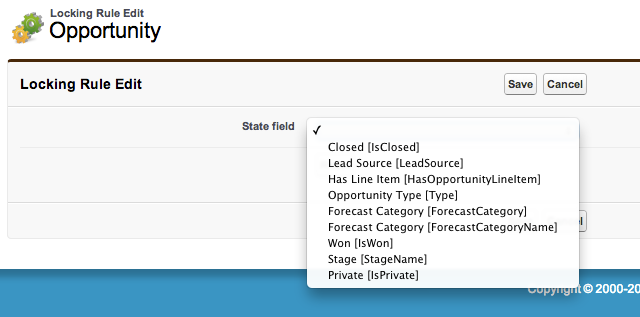
Click “Continue” and then pick a state field from the drop-down list.
Field locking is dependent on the state of a record, and this is defined by the selection of a state field. You can pick any checkbox or picklist for your state field, from standard fields, custom fields, or managed fields:
For example, on Opportunity you could pick “Stage” for your state field – so that you could then lock different selections of fields at each Opportunity Stage.
For simpler scenarios, you might pick the “Closed” checkbox for your state field – if you simply want to lock down some of the fields when an Opportunity is closed.
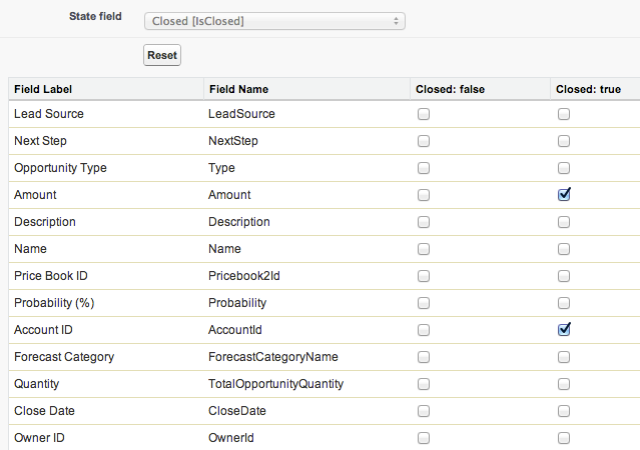
Having chosen a state field, you are presented with a checkbox grid. States run across the page horizontally, and fields run down the page vertically. Only editable fields are listed.
A check in a box indicates that the field in that row will be locked when the record is in the state indicated in the column.
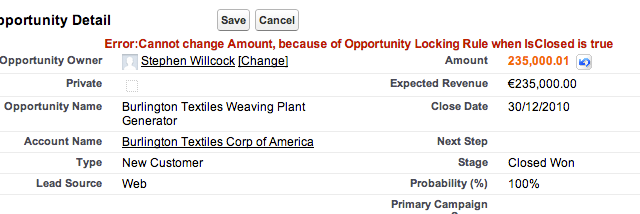
So, in this example, Opportunity Amount and Account will be locked when the Opportunity is closed:
If your state field is a picklist, then if a new value is subsequently added to the picklist – for example adding a new Opportunity Stage – then when returning to edit the Locking Rule, the new stage value will be added to the grid (all checkboxes for the new stage will be unchecked by default).
If you need to pick a different state field, click the “Reset” button. This will wipe out all your checkbox selections and allow you to choose a different state field.
When your checkbox selections are complete, click “Save”.
Rules in Operation
The rule will now apply to all changes to Opportunities. So, attempting to change the amount on a closed Opportunity will not now be allowed!
Under the hood…
Locking Rules are stored in a LockingRule object. This object has fields for the object API name, the state field API name, and a long text area field.
This long text area field is used to store the actual rule (the field locks) encoded in JSON. For example the sample Opportunity rule above would be stored as:
{"LockedFieldsByState":{"true":["Amount","AccountId"]}}
Actually in the original implementation the JSON looked very different from this. I derived the JSON structure to fit my UI, whereas ultimately what was needed was a structure which was designed to be efficient for the trigger – seeing as this would be executed much more frequently!
The UI for defining rules is Visualforce with a controller extension. This uses Apex Describes to find suitable state fields, and then editable fields which the user may want to lock. So, we can dynamically handle any object and lock any editable fields.
I translate the JSON to a list of a custom type in the controller (an inner class) on loading a rule, and translate back to JSON on save. It is then really easily to bind Visualforce controls to my list of this inner type.
As the JSON is designed to be efficient in the trigger, the trigger handler class is quite simple, whereas the controller has to do more work to map the UI to the JSON data.
Finally, the trigger handler class needs to be global because I intended not to implement the triggers in the same package, but in an extension package (or use unmanaged triggers).
Links
Evaluation beta package installation links:
LockingRules 1.1 (Beta 1)
LockingRules for CRM 1.0 (Beta 1)
LockingRules source code on Github
Apex Code Developer’s Guide – JSON Methods


 [Advertisement] Make your team a DevOps team with


