Shared posts

24 Aug 07:51

Spectrum Painting on 2.4 GHz

by Elliot Williams

Give a software-defined radio (SDR) platform to a few thousand geeks, and it’s pretty predictable what will happen: hackers gotta hack. We’re only surprised that it’s happening so soon. Spectrum Painter is one of the first cool hacks to come out of the rad1o badge given out at the CCCamp 2015. It makes it dead-simple to send images in Hellschreiber mode on a few different SDR hardware platforms.

What we especially like about the project is its simplicity. Don’t get us wrong, we’re tremendous fans of GNURadio and the GNURadio Companion software radio hacking environment. But if you just want to do something simple, like send a picture of a smiley-face, the all-capable GNURadio suite is overkill.

HackRF, the rad10 badge, and bladeRF all have software that enables you to directly load up and play out a file over the radio interface; it’s like a WAV file, only at radio frequency. This makes a hack like Spectrum Painter pretty straightforward. Simply convert the image file into the corresponding radio waveform data, and send it along. No GUI, no dragging, no dropping.

img2iqstream -s 1000000 -l 0.004 -o smiley.iqhackrf --format hackrf examples/smiley.png
hackrf_transfer -t smiley.iqhackrf -f 2450000000 -b 1750000 -s 1000000 -x 20 -a 1

Bam! Kudos [polygon]!

If all of this SDR action has your interest piqued, there’s a lot you can do even just receiving with an el cheapo RTL-SDR USB stick. It’s the gateway drug into SDR, so if you’re not addicted yet and you’ve got a free weekend, give it a shot.


Filed under: hardware, radio hacks
28 May 05:56

Businesses in Socialist Venezuela Quietly Turning to the U.S. Dollar as Their Own Currency Spirals

by Associated Press

CARACAS, Venezuela (AP) — It’s still possible to buy a gleaming Ford truck in Venezuela, rent a chic apartment in Caracas, and snag an American Airlines flight to Miami. Just not in the country’s official currency.

As the South American nation spirals into economic chaos, an increasing number of products are not only figuratively out of the reach of average consumers, but literally cannot be purchased in Venezuelan bolivars, which fell into a tailspin on the black market last week.

Venezuela's President Nicolas Maduro, right, and First Lady Cilia Flores wave to supporters at a pro-government rally with elderly people in Caracas, Venezuela, Sunday, Feb. 23, 2014. Maduro has been scrambling to squash an increasingly militant opposition movement after two weeks of anti-government protests against crime and inflation. (AP Photo/Rodrigo Abd)

Venezuela’s President Nicolas Maduro, right, and First Lady Cilia Flores wave to supporters at a pro-government rally with elderly people in Caracas, Venezuela, Sunday, Feb. 23, 2014. (AP Photo/Rodrigo Abd)

Businesses and individuals are turning to dollars even as the anti-American rhetoric of the socialist administration grows more strident. It’s a shift that’s allowing parts of the economy to limp along despite a cash crunch and the world’s highest inflation. But it could put some goods further out of reach of the working class, whose well-being has been the focal point of the country’s 16-year-old socialist revolution.

The latest sign of an emerging dual-currency system came earlier this month when Ford Motor Co. union officials announced the company had reached a deal with officials to sell trucks and sports utility vehicles in dollars only.

A few weeks earlier, American Airlines said it had stopped accepting bolivars for any of its 19 weekly flights out of Venezuela. Customers must now use a foreign credit card to buy the tickets online. Virtually all other foreign carriers have made the same switch with the government’s consent, according to the Venezuela Airlines Association.

Driving the shift is the crumbling value of the bolivar, which has lost more than half its value this year, plunging to 400 per dollar on the free market as Venezuelans scramble to convert their savings into a more stable currency. Desperate, people are selling bolivars for a rate 60 times weaker than the strongest of country’s three official exchange rates.

It’s a politically uncomfortable situation for President Nicolas Maduro, who regularly leads chants of “gringo go home” and says currency speculation is one of the main tools used by enemies to try to sow chaos and force him from power.

It’s not just businesses chasing greenbacks. Real estate contracts are still drafted in bolivars to satisfy a requirement imposed by late President Hugo Chavez, but in upscale neighborhoods most owners operate outside the law and sell and rent in dollars only. A group of realtors in tony eastern Caracas has established a password-protected website for listings in dollar prices.

Analysts say the administration likely sees a limited dollarization as the only way to prevent multinationals from leaving the county altogether, as Clorox did last year, citing problems brought about by decade-old currency controls, supply shortages and inflation that hit 68 percent last year, and economists believe is now well into the triple digits.

Production at Ford has fallen by 90 percent as the company struggles to gain access to dollars needed to import parts. Customers will now transfer Ford dollars in advance to pay for the import of the parts needed to assemble the cars in Venezuela, according to union officials.

Foreign airlines made their switch to dollars after the government refused to let them convert and repatriate $4 billion in ticket sales held in the country.

Meanwhile, inflation is racing so fast that ATMs have failed to keep pace. Many deliver a maximum of just $1.50 worth of bolivars per transaction. Some shoppers stay away from cash altogether, according to reports in local media, leaning more heavily on credit cards so they can pay for purchases later, when they’ll cost less in dollar terms thanks to inflation.

Decade-old price controls make staple items ridiculously cheap for all Venezuelans. A bottle of vegetable oil costs 20 cents at the black market rate, a package of rice costs half that, and a sack of sugar costs even less.

Still, many working-class Venezuelans are looking for ways to accumulate their own stockpile of the U.S. currency by offering services to wealthy or foreign clients.

“It’s the only way we can try to stay ahead,” said one gym teacher who supplements his $25 a month salary by offering personal training to clients who can pay in dollars. The teacher, who asked that his name not be used to protect his safety, keeps his bills hidden around his home until a friend or obliging client can deposit them in his Miami bank account.

The move toward currency substitution doesn’t sit well with hardcore government supporters, many of whom cut their political teeth listening to Chavez’s tirades against the “dictatorship of the dollar.”

“How is it possible that in the face of the U.S. effort to sabotage the revolution, we are allowing transnational companies to conduct business with the imperialist dollar in our country?” wrote Omar Hernandez, an engineer who works for Chavista community programs, on the influential pro-government website Aporrea.

But outside economists say Maduro would be wise to embrace the dollar outright.

Steve Hanke, a Johns Hopkins University economist who has long advised governments facing currency crises, says replacing the bolivar with the dollar would nip Venezuela’s inflation problem almost overnight and become an anchor of economic stability, though it could also force austerity measures. He points to the example of Maduro ally Rafael Correa in Ecuador, who has railed against the U.S. during his eight years in office but has so far shown no desire to bring back the old national currency, which the country did away with in favor of the dollar.

At the Ford factory, workers are optimistic that the new deal will save their jobs, according to union leader Gerardo Troya. In fact, they have an idea for more dollarization: They’d like to be paid in U.S. currency now too, starting at $8 a day.

Read more stories from TheBlaze

Hollywood Liberal Posts Damning Quote Attributed to Ted Cruz — Except It’s Fake. She Later Apologizes, Sort of.

‘Are You Really Saying?’: Ann Coulter Seemingly Stuns Host With Comment on Immigrants, Islamic State

Former Active-Duty Marine’s Simple Request Reportedly Results in College Labeling Him a ‘Threat’

Obama’s Forthcoming Executive Action Could Impact Your Property

Report Reveals the Clintons Operated a Shell Company to Funnel Payments to Bill Clinton

26 Sep 06:09

3DxHalloween – Cookie Cutters, Molds, and Other Tools for Halloween Treats #ElectronicHalloween #3DxHalloween #3DThursday #3DPrinting

by Matt

Today on our weekly live 3D Hangouts we get an early start on the season, celebrating the many ways that 3D printing can be put to use to celebrate your #ElectronicHalloween! The Ruiz Brothers shared a video featuring a number of their projects for you to try. And here are a few more 3DxHalloween projects to whet your appetite!


Halloween cookie cutters by mrbenbritton Thingiverse

Halloween cookie cutters by mrbenbritton: “A set of Halloween cookie cutters. I hope to add a few more before Halloween arrives.” (read more)


Raven Cookie Cutter by mifga Thingiverse

Raven Cookie Cutter by mifga


Jack o lantern saw by GA 3D Thingiverse

Jack-o-lantern saw by GA_3D: “I was thinking this afternoon that Halloween is coming up. In past years my keyhole saw has suffered rust from pumpkin guts, and a couple of years ago one of my kid’s friends nicked his hands with it.
I don’t happen to have a pumpkin handy for testing, but it seems like this should do the job with less risk to small fingers. It might do curves better if the blade was narrower, but that remains to be seen. When the time comes, I’ll have to print a copy of sliptonic’s Jack (0-lantern) knife for scooping punkin guts too!” (read more)


Pasted Image 9 25 14 1 22 AM

White Chocolate Skulls in PETT Trays by Anna Kaziunas France: “Every Halloween I make treats to give away. I don a costume and distribute them to everyone I meet during my Halloween travels. I call it “reverse trick-o-treating.” During October of 2012, I created a 3D-printed chocolate mold maker so I could create multiple batches of chocolates and individual trays in which to place the chocolates before bagging them. To cast the chocolates, I used food-safe silicone to make the final chocolate mold from the 3D-printed mold maker.” (read more)


Pasted Image 9 25 14 1 14 AM

Jack-O-Lantern Halloween Cookie Cutter by DanielNoree. (read more)


Pasted Image 9 25 14 1 18 AM

Mini Coldron by dmyers7: “Here is a mini coldron for Halloween. 70mm x 70mm. My wife needed several for a halloween game she is putting together for our daughters party. I’ve included the STL and Inventor Fusion file so you can add more detail or change it as you see fit. Enjoy! Happy Halloween.” (read more)


649-1
Every Thursday is #3dthursday here at Adafruit! The DIY 3D printing community has passion and dedication for making solid objects from digital models. Recently, we have noticed electronics projects integrated with 3D printed enclosures, brackets, and sculptures, so each Thursday we celebrate and highlight these bold pioneers!

Have you considered building a 3D project around an Arduino or other microcontroller? How about printing a bracket to mount your Raspberry Pi to the back of your HD monitor? And don’t forget the countless LED projects that are possible when you are modeling your projects in 3D!

The Adafruit Learning System has dozens of great tools to get you well on your way to creating incredible works of engineering, interactive art, and design with your 3D printer! We also offer the LulzBot TAZ – Open source 3D Printer and the Printrbot Simple Metal 3D Printer in our store. If you’ve made a cool project that combines 3D printing and electronics, be sure to let us know, and we’ll feature it here!

25 Jul 21:24

You Might Be Cool, But You’re Not Gas Turbine Motorcycle Cool

by Brian Benchoff
Jake Strichek

YES YES YES

jet

For the last four and a half years, [Anders] has been working on a motorcycle project. This isn’t just any old Harley covering a garage floor with oil – this is a gas turbine powered bike built to break the land speed record at Bonneville.

The engine inside [Anders]‘s bike is a gas turbine – not a jet engine. There’s really not much difference in the design of these engines, except for the fact that a turbine dumps all the energy into a drive shaft, while a true jet dumps all the energy into the front bumper of the car behind this bike. [Anders] built this engine from scratch, documented entirely on a massive 120 page forum thread. Just about everything is machined by him, bolted to a frame designed and fabricated by him, and with any luck, will break the land speed record of 349 km/h (216mph) on the salt flats of Bonneville.

As with all jet and turbine builds, this one must be heard to be believed. There are a few videos of the turbine in action below, including one where the turbine drives the rear wheel.


Filed under: transportation hacks
10 Jul 01:59

A Most Impractical Gear Position Indicator

by Brian Benchoff

GPI A few years ago, [Pat] sent in a really nice gear position indicator for his Suzuki V-Strom. With a single seven-segment display , a small microcontorller, and wires tied right into the bike’s ECM, it’s more than enough to do its job, and is much cheaper than aftermarket gear indicators. A simple, elegant solution that does one job well. How could this possibly be any better?

‘Better’ is a relative term, and depending on what you’re optimizing for, a more complex solution can easily be superior. [Pat] figured tripling the value of his motorcycle is a worthwhile goal, so he replaced that seven-segment display with an oscilloscope. It’s the world’s only oscilloscope based motorcycle gear position indicator, and now [Pat] needs a really, really long extension cord.

Like the earlier, more practical version, This build reads the voltage off the bike’s ECM to determine what gear the bike is in. The current gear is then displayed on a Tek MDO3000 with two PWM pins on a microcontroller. Practical? No, but it does look cool. Video below.


Filed under: transportation hacks
10 Jun 18:26

Measuring Car Engine RPM via the Cigarette Lighter

by Mathieu Stephan
Jake Strichek

amazing

delorean

Sometimes we forget how many things we can do with a simple oscilloscope. In this video [Ben] uses one that Tektronix lent him to measure his DeLorean engine RPM. By checking the car main ~12V voltage one may notice that the voltage spikes occurring are directly related to the engine speed, as they are created by the inductive kicks from the ignition coils. Obviously the multiplication you have to do to get the RPMs from the number of spikes per second depends on your engine configuration (flat 4, v6…).

The method that [Ben] used was to search for high amplitude spikes on the (AC coupled) car 12V Fast Fourier Transform (FFT) to get a reliable measurement given the many electrical noise sources present in his car. At the end of his video, he however mentioned that it could still be possible to get a good measurement with a simple voltage comparator and a high enough voltage reference.


Filed under: car hacks
30 May 21:16

Homemade Alarm System Doesn’t Lack Features

by James Hobson

alarm system

To many of us, our garage (or workshop) is probably one of the most important parts of the house. If a burglar broke in, we’d likely be more worried about our tools! [Ron Czapala] decided he needed an alarm system in his garage to keep his stuff safe, so he decided to build one from scratch.

The system makes use of a Parallax 4×4 keypad membrane, a MCP23008 port expander, a Parallax Propeller, a LCD screen, and a few switches to represent future magnetic reed switches located in the door and window.

Using circular buffers, the propeller has several states for monitoring the garage.

  • Not armed — ignore all sensors
  • Armed — system will react to changes in the sensors
  • Exit delay — system has been armed, 45 second countdown has begun to allow you to exit the garage
  • Window trigger — if the window is opened, the alarm will go off immediately (siren and strobe light)
  • Door trigger — alarm will go off in 60 seconds if correct code has not been entered on the keypad

For a complete demonstration, check out the following video where [Ron] explains it all!

Do you know what’s even cooler for your home alarm system? Lasers. Check out this laser trip wire alarm!

[Thanks Andrew!]


Filed under: Microcontrollers
19 May 18:10

Advanced Secrets Of NeoPixels!

by adafruit
05 May 23:24

Hello World Guide

by jlord

We just shipped our latest GitHub Guide: Hello-World. The "Hello World" project is a time-honored tradition in computer programming and now there is one just for GitHub. Hello repositories and Pull Requests! Hello Issues! Hello branches!

The Hello World guide walks you through the core Git and GitHub elements. When you're done you'll have a bright green contribution square and a repository to keep track of ideas or feedback.

GitHub :heart: New Users

We love that people are using GitHub to learn development and contribute to open source. We're excited to keep sharing the love with excellent help docs, YouTube Guides, free online classes, and Patchwork nights. Stay tuned, we're working hard on more interesting ways to help you learn and teach GitHub.

We have a team of designers and engineers lead by our most excellent user researcher, @chrissiebrodigan, focused on improving the experience for GitHub's new users. We want everyone to build software better, together -- especially if you're just getting started.

If you have a minute we'd love to know how you learn and teach Git and GitHub. We'll also share what we learn back here with you in a future post too.

01 May 20:30

KTOWN’s Guide to Readable C Code @ The Adafruit Learning System

by adafruit
Jake Strichek

Hey look at this

Adafruit 3014
KTOWN’s Guide to Readable C Code @ The Adafruit Learning System.

Code should be written to be readable and not just runnable.

Any code we write at Adafruit is ‘read’ by a many thousands of people with varying levels of experience with the software and hardware they are working with.

That puts a unique burden on us to produce code that doesn’t just ‘work’, but is also easy to understand and maintain.

In a conscious effort to improve our own code in this area, we’ve put together this simple guide to writing code that’s easier to read, maintain and understand.

While everything suggested here is somewhat personal, and largely a reflection of my own habits working in C over the years, as Adafruit continues to grow as a company we want to put more emphasis on code quality, in the same way we’ve focused on the quality of our HW designs and tutorials.

We’ve tried to keep these guidelines as general as possible recognizing that everyone has (and has the right to) their own style, but there are some things we think are worth insisting on in the interest of readability and keeping things accessible for customers.

Learn more.

14 Mar 18:15

Old Inkjet Turned Into An SVG Plotter

by Brian Benchoff
Jake Strichek

LOOK AT THIS!

plotter

What do you do when you have an old printer, a portable CD player, and a handful of other electronics sitting around? Turn it into a plotter, of course.

The frame of the plotter was taken from a ye olde Epson printer, reusing the two stepper motors to move the paper along its length and width. The pen is attached to the laser head of a junked portable CD player. With this, it’s just three stepper motors that allow the Arduino control system to move the pen across the paper and put a few markings down.

The motors on the printer are, in the spirit of reuse, still connected to the printer’s driver board, with a few leads going directly from the Arduino to the parallel port interface. The motor in the CD player is another ordeal, with a single H-bridge controlling the lifting of the pen.

On the software side of things, a Processing sketch reads an SVG file and generates a list of coordinates along a path. The precision of the coordinates is set as a variable, but from the video of the plotter below, this plotter has at least as much resolution as the tip of the pen.

https://www.youtube.com/watch?v=8D1G_FwMjrk


Filed under: Arduino Hacks
03 Mar 18:35

Hot or Not? Find Out How to Calculate Component Heat and Why You Should

by Bil Herd
Jake Strichek

good read!

How hot are your key components getting? There’s a good chance you’ve built a project and thought: “Well I guess I better slap a heat sink in there to be safe”. But when working on a more refined build you really need to calculate heat dissipation to ensure reliability. This is actually not tough at all. The numbers are right there in the datasheet. Yes, that datasheet packed with number, figures, tables, graphs, slogans, marketing statements, order numbers… you know right where to look, don’t you?

Hackaday has you covered on this one. In under 10 minutes [Bil Herd] will not only show how easy these calculations are, he’ll tell you where to look in the datasheets to get the info you need quickly.

bil-herd-heat-resistance-formula

Above, [Bil] used his bench as a whiteboard to illustrate the thermal resistance equation. In this case each resistor symbol represents part of the heat dissipation. You must consider all places where heat can be transferred: (from left to right) the component die (junction) to the component case, the component case to a heat sink, and the heat sink to ambient air. He illustrates each of these dissipation points in the video.

Theta Junction to Case Tjc

Calculate thermal resistance – Theta Junction to Case Tjc

An example of the junction-to-case is shown to the right. This is a TO-3 case which has had the lid cut off. It’s a much simpler way to look at a chip die than trying to decap a component with a plastic case.

Make with the Math Already!

Okay, okay, we’re getting there. The math is not hard… just multiplication and addition, so hang on a minute more.

Gather the following values: maximum power you plan to use with this component, maximum heat rating of the part, maximum ambient air temperature in which this component will be used, and the theta values from the datasheets. Theta, which is a measure of degrees per watt, is often listed as a symbol: Θ  Multiply theta by the max wattage and you will know how much temperature to add to your equation

Datasheets: Finding Θ and Temperature

Because [Bil] does such a great job in the video we’re giving you the quick version here. Temperature generating components will include a maximum operating temperature like the one shown below (click through for full datasheet) which is for a linear regulator:

The theta for “Juntion-to-Case” is found a bit further down the same datasheet in the Electrical Characteristics table. Datasheets will also provide a “Junction-to-Ambient” value (also shown below but not used in our calculations) used to calculate how much power you can use without any type of active or passive cooling. This answers the question of: “do I need a heat sink?”.

Finally, you want to look at values from the heat sink being used. [Bil] looks at the datasheet of a heat sink which lists a thermal resistance of 25.8Θ with the chart below on the left showing how that number may be altered with moving air (a fan). The chart to the right covers the use of interface agents like thermal grease, and a mica pad (for electrical insulation) with thermal grease. Both of those values are circled but only one will be used in the calculation.

7173dg_cv

Putting It All Together

If we assume an ambient air temperature of 38 C (100 F) and a maximum power of 2 W all of the numbers we need have been collected.

Max Temp = Junction + Mica/Grease + Heat Sink + Ambient

Max Temp =  (4Θ * 2W)º +  (0.4Θ * 2W)º + (25Θ * 2W)º +  38º

Max Temp =  8º + 0.8º +  50º + 38º

Max Temp = 96.8º

The maximum temperature rating for this part is 125 C, which means that this part is being properly cooled. [Bil] goes one step further in the video, showing how to calculate how much more reliable the properly cooled part will be.

Resources


Filed under: Featured, how-to
03 Mar 17:46

KDE Visual Design Group: Not the monday report but some clarification

25 Feb 05:56

Guest Post: Try Radar for Your Next Project

by Gregory L. Charvat
Jake Strichek

Must Learn

greg_sar_radar

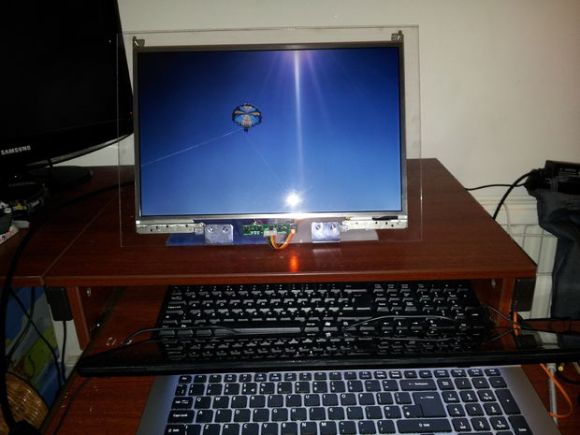
(photo taken by Matt Metts)

Sensors. The low-end stuff that we can get our hands on usually suffers from poor range, lack of sensitivity, and no way to characterize what the target is. But today we can use the good stuff that, until recently, was only available to military: radar. In this post we will discuss how radar works, commercially available small radar devices, and where to learn more to help make it easy to add radar to your next project. Reach out and sense something!

Radar Basics

radar_simple_example

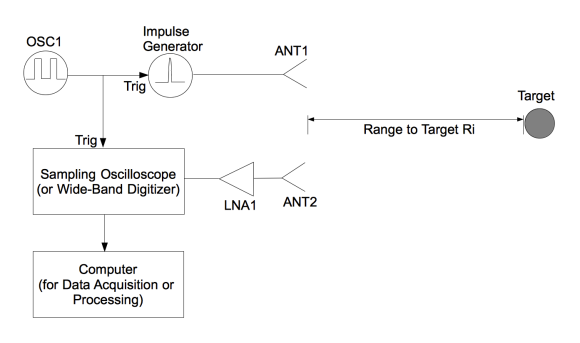
Radar uses a radio transmitter and receiver to measure the time of flight from a transmitted radio wave that scatters off a target back to the receiver.

Radar is simple, it consists of a radio transmitter and receiver. Radar is a World War Two acronym meaning Radio Direction and Ranging, in other words a radar consists of a radio transmitter and receiver where the range to an object is measured by clocking the time between the transmitter transmitting a known modulated waveform and the receiver receiving this waveform scattered from a target.

basic_pulsed_radar

This block diagram represents a conventional radar that comes to mind when you think about radar, you might find this design used on a fishing boat or commercial aircraft.

One enabling technology for Radar was the cathode ray tube (CRT), which facilitated a method of measuring the time delay between transmitted and received waveforms. This led to the development of numerous radar sensors used in the second world war, which generally followed the Plan Position Indicator (PPI) architecture.

Toady, rather than using a CRT we can use high-speed digitizers. This offers the obvious advantage of applying signal processing to acquired data so that only moving targets are detected, tracking can be achieved, imaging, and a multitude of other modes.

But for hobbyist and consumer projects we do not need this much power, range, and can not afford the cost. We need the ability to sense like a long range radar (detecting only moving targets, imaging, Doppler, signatures, etc) but at short ranges and at low costs.

Very few off-shelf small radar options exist as of today. In this post we’ll review these, their basic architectures, and direct you on the next steps.

Continuous Wave (CW) Doppler Radar

coherent_CW_Doppler_radar

How CW Doppler radar works.

If you are not interested in ranging or imaging but would like to measure velocities or radar signatures then consider CW Doppler radar. CW Doppler radar works by feeding the output of a CW oscillator to an antenna and radiates that carrier towards a moving target. This carrier scatters off the moving target back to the receive antenna where it is amplified and fed to a frequency mixer. The mixer mixes the oscillator and the scattered carrier resulting in a Doppler shift product. This product is the Doppler shift off of the carrier’s center frequency and is generally in the KHz range. Low enough to be easily digitized by the audio input port of a laptop computer or other low-cost digitizer.

Chinese CW doppler radar

A low-cost X-band CW Doppler Radar Module, readily available on Ebay.

Try a CW Doppler radar. You can hack an old police radar gun  by locating the video amplifier or mixer’s output and plugging that signal into the audio input port of your laptop and displaying this data using a ‘water fall’ Fourier transform.

If you find an old motion sensor or door opener. These typically use CW Doppler radar modules known as Gunnplexers. Hack into one just as you would with the Police radar.

Or, you can procure new off-shelf X-band CW Doppler radar devices from China for < $10 on Ebay. I’ve used these devices before, they do work but have limited range. This may not matter for your project.

Impulse Radar

basic_impulse_radar

The most basic impulse radar simply feeds the output of the impulse generator directly to the transmit antenna. Scattered impulses are amplified and digitized.

Short range radars sense at 150m or less. At these short ranges extremely short pulses (meaning short in time duration, nS or pS in duration) are required to provide sufficient resolution to be useful. Short pulse, or impulse radar systems, generally follow a simple architecture where the impulse generator is often tied directly to a transmit antenna and a low noise amplifier (LNA) is tied to a receive antenna. A high speed digitizer is triggered off the impulse generator and acquires data on the output of the LNA.

NVA6100_Match

Novelda manufactures single-chip impulse radar devices.

You can incorporate impulse radar technology into your next project. Commercial versions of impulse radars are available to hobbyists and developers. Most notable are the ASIC based impulse radar manufactured by Novelda. These devices do require external antennas but contain on-board radar and high speed digitizers.

Additional impulse radar systems are being manufactured in quantity for automotive applications (blind spot detection, parking aids, etc), but details on these are not easy to find unless you directly engage the manufacturers. Manufacturers of automotive radar equipment include, Delphi, Continental, TRW, Bosch, Denso, and Autoliv.

Frequency Modulated Continuous Wave (FMCW) Radar

FMCW radar was originally used in radar altimeters starting in the 1930′s. Today, FMCW radar is the leading short-range radar architecture because it offers short-pulse radar resolution while providing significantly greater sensitivity with the same peak transmit power. This is because FMCW radars transmit continuously and leverage the discrete Fourier transform (DFT) to increase SNR in proportion to the time over which the DFT is applied. But for a hobbyist the key take-away is that these radars use a simple architecture and radar signals can be acquired by low-bandwidth digitizers such as the audio input port on your laptop, ADC input ports on micro controllers, the lower cost National Instruments NIDAQ units, etc.

coherent_FMCW_radar

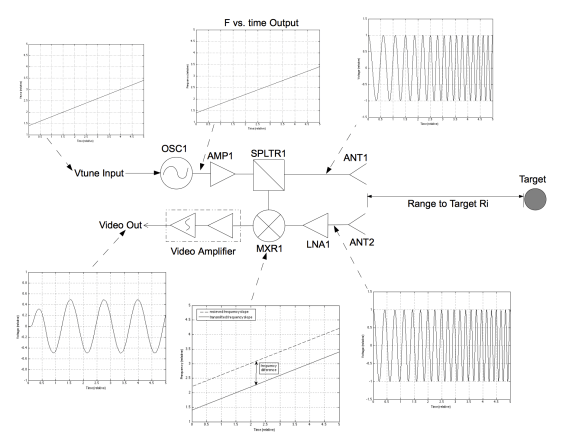
How FMCW radar works.

For an FMCW radar, a CW oscillator is frequency modulated with a linear ramp. In other words, the CW oscillator starts at one frequency and ramps-up to a second over a relatively long period of time (0.5-10 uS). This waveform is radiated out of the transmit antenna towards the target scene. Some of this waveform is fed to the receiver mixer. What is scattered off the target is amplified by the LNA and fed into the receive mixer where it is mixed with the transmit waveform. The mixing product results in a low frequency (KHz range) beat tone that is proportional to range. The higher the frequency of beat tone the further the target. If measuring a multitude of targets then expect to see a multitude of beat tones superimposed on each other. To measure the range to targets you digitize with a low bandwidth digitizer being careful to synchronize the digitizer’s trigger with the start of the up-ramp. With this digitized data for each up-ramp, apply the DFT. This results in a time domain representation of the round trip time from transmitter, to targets, and back to receiver.

KCL-1 coffe can radar photo res-ll-003iap11 QDM radar kit k650q-Arduino+Radar_teaser

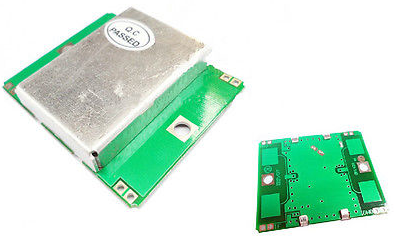
Add an FMCW radar to your next project. FMCW radar devices are available for developers and hobbyists. Some of the lowest cost FMCW radar devices are manufactured by RF Beam Microwave GmbH, who offers 24 GHz FMCW radar modules for less than $10 in quantity, shown here is a K-LC1.

In addition to this, you can build your own ‘Coffee Can Radar’ from the MIT Opencourseware site.

Not interested in building your own coffee can radar from scratch? You can buy a ready-made coffee can radar kit form Quonset Microwave. This radar provides data via a USB or BlueTooth.

And coming soon will be the radar Arduino shield! Credit for this belongs to Tony Long, who developed this shield loosely based on the MIT Coffee Can radar.


Learn more

Add a radar sensor to your next project. It is not difficult to do with some basic understanding of architectures and signal processing. To learn more,

We can do this.

Soon small radar devices will be everywhere, let your project be one of the first!


DSC_0318Gregory L. Charvat, is author of Small and Short-Range Radar systems, co-founder of Butterfly Network Inc., visiting research scientist at the Camera Culture Group MIT Media Lab, and editor of the Gregory L. Charvat Series on Practical Approaches to Electrical Engineering. He was a technical staff member at MIT Lincoln Laboratory from September 2007 to November 2011, where his work on through-wall radar won best paper at the 2010 MSS Tri-Services Radar Symposium and is an MIT Office of the Provost 2011 research highlight. He has taught short radar courses at the Massachusetts Institute of Technology, where his Build a Small Radar Sensor course was the top-ranked MIT professional education course in 2011 and has become widely adopted by other universities, laboratories, and private organizations. He has developed numerous rail SAR imaging sensors, phased array radar systems, and impulse radar systems; holds several patents; and has developed many other radar sensors and radio and audio equipment. He earned a Ph.D in electrical engineering in 2007, MSEE in 2003, and BSEE in 2002 from Michigan State University, and is a senior member of the IEEE, where he served on the steering committee for the 2010 and 2013 IEEE International Symposium on Phased Array Systems and Technology and chaired the IEEE Antennas and Propagation Society Boston Chapter from 2010-2011.


Filed under: Featured, news, radio hacks
10 Feb 20:57

Trademark Guidelines for open source projects and more… #makerbusiness

by adafruit
Jake Strichek

look in to this!

Adafruit 2597

Model Trademark Guidelines.

Welcome to the Model Trademark Guidelines, written by and for free and open source software communities. This site proposes language one might use for trademark guidelines for FLOSS software projects. It describes various provisions that might be included in trademark guidelines and discusses the legal considerations for the provisions. It is not intended to advocate for any particular set of permissions or restrictions, but rather is designed to provide a range of choices that would be found lawful and enforceable under trademark law, that are consistent with FLOSS culture, and that respect the trademark owner’s desire to ensure that the software distributed under the trademark delivers a consistent user experience and meets the brand promise of the name.

Pam is the creator of this, it’s great and here’s why she made it—

I was inspired when I worked at Red Hat as its inside trademark counsel and saw many sites that didn’t have guidelines, and those that did had differing opinions on what should be permitted and what shouldn’t be. I thought it would be beneficial to create some common understanding on the community level, in the way that people have common understandings about what you can do with software if has a GPL license, Mozilla license, etc., which makes life easier for everyone using the licenses. I’ve since left Red Hat and now have a private practice, although I am still actively involved in the open source community.

09 Feb 21:09

Mario Doorbell Guaranteed To Drive A-You A-Crazy

by Josh Marsh

marioDoorbell

Is your doorbell not exciting enough for your guests? [Joe] wanted to provide a little entertainment for his visitors, so he redesigned his doorbell with a Mario theme.

Whenever someone presses the button—which carries the Mario coin image—the segment display increments and the Mario coin sound plays. To add variety, the life-up sound plays at every 10 coins and the mushroom upgrade sound plays upon reaching 100. [Joe] tried putting the life-up sound at its appropriate 100′s place and the mushroom sound at every 10, but he decided the brevity of life-up was more tolerable in the 10′s slot.

The project was divided into two components. The door button has a PIC16F628A microcontroller with a dual 7-segment LED display, a button, and a homemade circuit board. All this lives in a simple box covered by a Yoshi’s Island-themed decal. The button’s board connects to a separate ringer board—based around a PIC16F87—with a MCP4822 DAC and a 25LC1024 EEPROM. Button presses on the first board prompt a request for a sound clip read on the EEPROM. Keep clicking for a demo video below.


Filed under: Microcontrollers
07 Feb 20:54

Turning a Broken Laptop’s LCD into a Fancy Monitor

by James Hobson
Jake Strichek

I need to do this!

FGWRAMCHR9V78UC.MEDIUM

Seems like you can find broken laptops everywhere these days — so why not do something with them? [Damutsch] shows us how to make a rather cool looking monitor from a laptop’s LCD display.

First, you’ll need to salvage a working LCD from a dead laptop. Once you have the panel out you can identify the serial key and order a controller board off eBay, which will allow you to plug a normal video input such as VGA or HDMI into the panel. We browsed around a bit and it looks like you can get driver boards from around $15-$30, so not too bad price-wise. It wasn’t so long ago that salvaged LCD panels were basically unusable because of a lack of these driver boards.

Now that you have an LCD panel and a controller board you’ll have to mount it somehow. [Damutsch] decided to use plexi-glass and we’re a fan of the result, kind of modern while still showing off the inside guts. You could also get fancy and bend the acrylic with a hot wire forming tool!


Filed under: computer hacks
06 Feb 20:34

The Pegasus Touch 3D Printer #3DThursday #3DPrinting #3D

by Matt
Jake Strichek

Dude NEED lazer!!!

Pasted Image 2 6 14 12 29 AM

Some shots of the Full Spectrum Laser 3D printer, announced at CES, from Fabbaloo:

Everyone’s getting in on the laser-resin 3D printer market, it seems. Now we see Full Spectrum Laser, a company previously dedicated to traditional laser equipment, has produced their very first 3D printer, the Pegasus Touch.

The company currently markets laser engraving equipment, but launching a 3D printer is an entirely new venture. It makes sense as they can apply their considerable laser expertise to the problem. We got the impression they’re trying to make the lowest cost SLA 3D printer possible.

The Pegasus Touch, like most resin-based 3D printers, includes a transparent orange cover that keeps out UV rays that would otherwise solidify the resin. It contains a blue ray 405nm laser, which should be well-performing as Full Spectrum Laser knows their lasers. A spokesperson indicated 0.05mm resolution is possible, but 0.1mm resolution is standard.  

This machine is not slow; we were told a 22cm Eiffel Tower model was printed in approximately five hours, suggesting a vertical print speed of ~40mm/s, at least for that model….
  

Read more.

Pasted Image 2 6 14 12 29 AM


649-1
Every Thursday is #3dthursday here at Adafruit! The DIY 3D printing community has passion and dedication for making solid objects from digital models. Recently, we have noticed electronics projects integrated with 3D printed enclosures, brackets, and sculptures, so each Thursday we celebrate and highlight these bold pioneers!

Have you considered building a 3D project around an Arduino or other microcontroller? How about printing a bracket to mount your Raspberry Pi to the back of your HD monitor? And don’t forget the countless LED projects that are possible when you are modeling your projects in 3D!

The Adafruit Learning System has dozens of great tools to get you well on your way to creating incredible works of engineering, interactive art, and design with your 3D printer! We also offer the MakerBot Digitizer in our store. If you’ve made a cool project that combines 3D printing and electronics, be sure to let us know, and we’ll feature it here!

02 Jan 03:46

Building An Engine Control Unit With The STM32F4

by Brian Benchoff
Jake Strichek

Look at this!

ECU

If you’re looking to soup up your whip, the first place you’ll probably look is the engine control unit. This computer shoved in the engine compartment controls just about every aspect of your car’s performance, from the air/fuel ratio, the ignition timing, and the valve controls. Upgrading the ECU usually means flashing new firmware on the device, but [Andrey] is taking it one step further: he’s building his own ECU using the STM32F4 Discovery dev board.

[Andrey]‘s ride is a 1996 Ford Aspire, but while he was developing his open source ECU, he wanted to be able to drive his car. No problem, as going down to the junkyard, picking up a spare, and reverse engineering that was a cheap and easy way to do some development. After powering this spare ECU with an ATX supply, [Andrey] was able to figure out a circuit to get sensor input to his microcontroller and having his dev board control the fuel injector.

With a few additional bits of hardware [Andrey] has his open ECU controlling the fuel injection, ignition, fuel pump, and idle air valve solenoid. Not a bad replacement for something that took Ford engineers thousands of man hours to create.

[Andrey]‘s ECU actually works, too. In the video below, you can see him driving around a snow-covered waste with his DIY ECU controlling all aspects of the engine. If the engine sounds a little rough, it’s because a wire came loose and he was only using two cylinders. A bit of hot glue will fix that, though.


Filed under: ARM, transportation hacks
06 Aug 02:24

Centimeter-level precision GPS for $900

by Brian Benchoff

back

[Colin] and [Fergus] have been working with GPS for years now, and like most builders of really cool things, they’re often limited by the precision of off-the-shelf GPS units. While a GPS receiver is usually good for meters of accuracy,  this just isn’t good enough for a lot of projects. What you need is centimeter-level accuracy, something the guys have managed to do with their Piksi GPS receiver.

Where most GPS receivers only look at the data coming from the GPS satellites orbiting overhead, the Piksi uses another technique, real-time kinematics (RTK), to determine the receiver’s location with exacting precision. The basic idea behind RTK is to look at the carrier frequency of the GPS signals at 1575.42 MHz. This frequency has a wavelength of 19 cm, compared to the alternating 1s and 0s of the that are transmitted at around 1 MHz, or about 300 meters between each bit. While centimeter-level precision isn’t possible with only one receiver, two of these Piksi boards – one base station and one on a vehicle, connected via radio link – can make for a very exacting high-accuracy GPS receiver.

Previously, commercial RTK GPS systems have cost thousands of dollars – making a quadcopter or other homebrew project that relies on this level of precision nonsensical. [Colin] and [Fergus] have built hardware that can bring the price of this setup to under $1000. As a bonus, the Piksi board can also receive from other constellations such as Galileo and GLONASS. A very impressive piece of hardware, and we can’t wait to see the applications.


Filed under: hardware, kickstarter